Saturday, July 20, 2013

Sardinian Needlework - Puntu Vanu, Punt'e Nù and Punt'a Brodu


Summer always has me thinking of learning something new and I usually decide to tackle a technique that I haven't tried yet. This summer though I am thinking of getting to know some techniques a little better instead of taking on a new one.

Lots of Italians head to Sardinia for their summer holidays and since I can't do that, I've been revisiting some of their needlework techniques in the unusually sunny weather we are having at home. There is nothing better than sunlight for visibility when stitching so I've been out on my deck under my own ombrellone.

In the spring of 2011 I visited Sardinia and spent some time getting to know a few Sardinian needlework techniques like Puntu Vanu, a type of smocking and two techniques that are specifically from Teulada: Punt'e Nù and Punt'a Brodu.

I'm running into all kinds of difficulties not the least of which is lack of good eyesight!

Puntu Vanu is usually executed on percale cotton fabric as it is traditionally worked into a shirt or blouse. I honestly tried to perform an evenly spaced running stitch line on a piece of percale but I couldn't see well enough to do more than a few stitches a day without hurting my eyes with the amount of magnification I needed so I switched to a piece of Sotema Batiste cotton.

Using Rosalba Lecca and Ebe Ciampalini's book, I chose a simple heart pattern and then withdrew one ground fabric thread into which I stitched my first running stitch line.

The first stitching line of my Puntu Vanu piece.

It was tough going as even the fabric count on the Batiste cotton is quite high. Eventually I figured out that if I wrapped my finger in piece of dark leather-like cloth and laid the work over it, I could see relatively well and the stitches went more quickly (the leather-like cloth was sent to me by the lovely Elizabeth Prickett for use when making Ruskin Lace. Unfortunately Elizabeth has since passed away so I cannot ask her for a supplier or even what the cloth is made of. If you really want to know, you could try contacting the webstore).

As Puntu Vanu is a kind of smocking, the strip of embroidery must be long as it will be pulled so that the fabric bunches up to form the pattern. Roughly a 36 inch strip of the Batiste of this thread count will produce a 12 inch piece of embroidery. I'll update you as I stitch more.

Photo from: Luoghi e Volti del Punto Filza

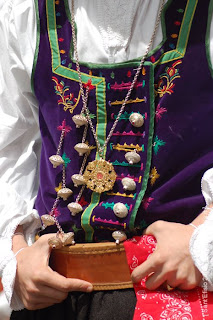
For my Punt'e Nù practise, I decided to make a bookmark using some of the colours found on the traditional Teulada man's costume. 


I took some patterns from this blog where you can also find the instructions on how to execute this embroidery. While you're there search Puntu Vanu, Punt'e Nù and Punt'a Brodu for some great photos! 

I think I'll trim my fringe down a bit more. This was made on 28ct Jubilee cotton fabric using DMC no. 8 Pearl Cotton:

Punt'e Nù stitching

And for Punt'a Brodu, I've taken part of a pattern off of a lovely vase painted by Marilena Ledda that I saw while in Sardinia in 2011:

The work of artist Marilena Ledda
I'm still trying to perfect my stitching on this pattern that I proposed for the EGA magazine Needlearts, June 2013. In the magazine, I did the pattern using embroidery floss but here I've done it using DMC no. 80 tatting thread. I still need a LOT of practise!


I hope you have enjoyed "travelling" to Sardinia with me. As far as I know there are no instructional books on Punt'e Nù or Punt'a Brodu. The instructions (which start in Febbraio 2010) for Punt'e Nù on the blog I mentioned above are quite good - give them a try! The only book I know of on Puntu Vanu is the one I mentioned above.

Thursday, July 18, 2013

Punto Antico - Bruna Gubbini's Seventh Book!


Bruna Gubbini of the Associazione Il Punto Antico in San Giovanni in Persiceto, near Bologna has released her seventh volume about Punto Antico Embroidery.

This latest publication has Italian and English text, is over 160 pages packed full of colour photos and offers 20 projects!

From the introduction:
In this new book you will find, apart from bed sheets, cushions and towels, many tablecloths among which are different examples of runners.
My students appreciate this new way to dress the table because the runners are more elegant than the simple placemats, less onerous to work than the classic tablecloth and easier to wash and iron. They can make different designs which can be combined with each other in order to avoid repetition. The runner can also be used as a table centre.
The book concludes with a ring cushion and a series of beautiful favours entirely worked by hand.

There is a small how-to section at the beginning of this book and then more how-tos sprinkled in with the projects themselves. Signora Gubbini's impeccable good taste regarding colours and motif combinations is elegantly displayed with the help of her students and their works.


The photography and styling is delightful. If you are already a fan of Signora Gubbini's books, you will not be disappointed and if you are new to them, all I can tell you is that they are definitely worth the cover price. There are so many inspiring ideas and lovely embroideries to look at!


I am intrigued by the use of a large hoop stand which seems to enable four ladies to collaborate on the work of one piece! Not that I'd want to stand and stitch but it does make me think of an old quilting stand that I have which would be useful for executing embroidery on a tablecloth.

Indulge yourself! This book can be purchased directly from the Associazione Il Punto Antico.

Monday, July 15, 2013

Triple Knotted Tassel


As mentioned in this post, I decided to try to make a tassel from Rosalba Pepi's latest book on Catherine de'Medici Embroidery. Now I'm not going to give away her instructions but I just want to show you another way to achieve knotted tassels which we've discussed before.

So, I've cut a 4m length of 100% cotton Cotone Povero yarn to make the second leg of this tassel. I tied a knot at each end because after all the knotting, the ends tend to become quite unravelled and messy and you lose a lot of your length. Sometimes all you need is just another inch and if it's unravelled and destroyed it can be frustrating. Let's call this long thread the main body thread just because it may become confusing later as to what I'm referring to.

First leg of the tassel completed.
The reason that the main body thread has to be so long is that all those knots upon knots consume a lot of yarn. By the way, kitchen string works nicely if you want to try this method out before investing in some yarn.

Since this tassel requires two legs be made out of the main body thread, I measure out to the half way point (marking it for now with a paper clip) and start a little to the right of it. The centre of the main body thread will, after being folded in half, be where we'll need to attach the "handle" of the tassel so I need to leave a little space for that.

Let me note here that there are no detailed step-by-step instructions in Rosalba's book, so I'm stumbling along on my own. I'm sure there is probably a better way to do this, and it could also be that I'm doing it totally wrong. In other words this is not the authoritative guide to this technique!

The first thing we need to do is make a series of big knots for what will form the head of the tassel.

I made four knots side-by-side


and then made them all into one knot (let's call it a doubled knot).


The end result didn't seem big enough to me so I then made another three more doubled knots


and tied all four into one tripled knot.


Of course you can go on and on and achieve even bigger knots this way but I stopped here. The resulting tripled knot is an interesting little uneven blob.

On I merrily went attaching other lengths of thread with tripled knots by piercing through the main body thread, making doubled knots on either side of groupings of small knotted lengths like I made here which are attached by threading them on to the main body thread like beads.

The only thing to note was that I ended off the completed side of the main body thread with a tripled knot and didn't tie another knot on the main body thread to secure it so in no time at all while I was working on the other side, it came undone!

Of course I had already trimmed the main body thread and therefore I didn't have enough length to re-tie the ending triple knot again, nor to secure it with another single knot.

Argh!

Long about this time the tripled knots that I'd made on short lengths of thread and attached by piercing the main body thread also came undone as they didn't have a knot at the end of their lengths to secure them either.

Double argh!!

I went back and checked out the first leg that I had completed previously (first photo above) and sure enough all the triple knots at the end of all their lengths came undone easily.

Triple argh!!!

At this point I must confess I threw the whole thing in the stitching garbage can which contains thread and fabric and paper only. Muttering to myself I went off in frustration to do something else.

Later, with a cooler head, I dug it out and cut off the parts that had undone. I attached new lengths of thread with a weaver's knot to the main body thread and remade the missing parts. As this is all constructed of knots over knots, no one will ever see where I attached new lengths of yarn!


Here it is, I could have left more space between the head and the first part of the skirt and the head itself is quite irregular (Rosalba's is so much better!). All in all, I like it, I would make another one. What do you think?


Saturday, July 13, 2013

Catherine de'Medici Embroidery - New book and some experiments


A couple of months ago this new book by Rosalba Pepi came out on Catherine de'Medici Embroidery. I have just recently gotten my hands on a copy of this over 120 page volume. I've told you a bit about Catherine de'Medici Embroidery in a few previous posts so you already know that it's a technique that I admire. I've written a bit about Rosalba Pepi of the Laboratorio Tessile di Alice in Castiglion Fiorentino, in the province of Arezzo in previous posts as well. She is also someone that I admire.

Rosalba has a very creative mind when it comes to textiles and has taken ancient traditional techniques like Trapunto and Catherine de' Medici Embroidery and made them delightfully contemporary: see one of her kits here and one of her books here. She was a part of the publication of this essential book on Tassels too.

Rosalba loves to work in breathtaking silk threads dyed with natural materials. Make yourself a cuppa and explore the website of the Laboratorio Tessile di Alice which has Italian and English language versions - you will be delighted by Rosalba's works.

Back to this book: The first section is a few pages on the history of the running stitch with photos of contemporary and early 20th century Catherine de'Medici Embroidery works among other things and a bit about the history of traditional materials used, colours and ideas for application of this technique. (Text in Italian) There follows an instructional section with clear diagrams for executing different pattern lines and starting and finishing working threads. There are some ideas and instructions for edge finishings and tassels too - as well as the care and maintenance of stitched pieces and the tools required for executing the work. The remaining 3/4 of the book is choc-full of over 75 charted patterns and motifs and colour photos of finished works.

There are no precise project instructions but that didn't stop me from deciding on a table runner project anyway. Inspired by Rosalba's use of indigo-dyed silk yarn, I ran off yesterday to my local knitting shop with a ball of Cotone Povero - the traditional cotton yarn used in Catherine de'Medici Embroidery and a piece of undyed modern Buratto linen fabric from Sotema. I found a 17%silk/83%cotton blend of yarn called Night Sea from Misti Alpaca which is slightly thicker than the Cotone Povero yarn but will work nicely all the same. Last night I stitched a bit of a sample border on a scrap of undyed Buratto.

Can you find my stitching error?

Worried about the colour running, I soaked the embroidery in cold water (the label says it's to be washed at 30 degrees) and Marsiglia (Marseille) soap for about an hour. The water was a bit blue but I can't detect any bleed marks on the fabric, at least it doesn't show up so much that it catches the eye. However when I ironed it dry face-down on a white towel, it left some blue on the towel. The hank of yarn is now soaking in a tub of soap and water and I'll be rinsing it until no more blue comes out.

In the meantime, I decided to try one of the tassels from the book using the traditional Cotone Povero yarn.

This is the first of two legs that will be tied together to make the tassel:


This tassel is made of knots on top of knots. I'm going to photograph the process of the second leg so I'll save that for a future post.

In Europe you can purchase this book directly from NuovaS1 the publisher via bank transfer. To pay with PayPal, check out Tombolo Disegni, click on "Libri/Books", then "Libri Ricamo", then "Assisi, Caterina de Medici, Ricamo a Treccia e Nappine" - its about halfway down the page. Send an email to order.


Wednesday, July 10, 2013

Needle lace lady - Punto Maglie New Book


Two of the most characteristic motifs in Punto Maglie needle lace are the delightful human figures. The male figure is called the Pupo and the female, Pupa.

For their first book, the Associazione Punto Maglie has chosen to introduce us to the Pupa – a lovely little needle lace lady in a dress with a decorated hemline and three little buttons made of bullion knots down the bodice.

This slim, hardcover volume has 30 or so pages which are packed with step-by-step photos - each area of the design is broken down and gone over. Who would have thought that you'd build your Pupa upside-down?

Instructions include the materials needed, where to place your support stitches which help you to execute the needle lace, the various needle lace stitches used, the order of the work and pages and pages of photos.

Text is in Italian but if you have a little experience with needle lace you should do fine. The finished project is a 1.75 inch by 1.75 inch insert.


I look forward to those long summer days filled with sunshine to try my hand at this lovely little lady!

The book can be purchased directly from the Associazione Punto Maglie.

Wednesday, July 3, 2013

Trapunto - Silvana Vannini - Part Four


This is the fourth (and final) part of a series written by Silvana Vannini of Italy and translated into English by myself.

Trapunto - Silvana Vannini - Part One
Trapunto - Silvana Vannini - Part Two
Trapunto - Silvana Vannini - Part Three (project part one)

Trapunto - Silvana Vannini - Italian Version


Trapunto Heart Pincushion Project
by Silvana Vannini

This is the second part of Silvana Vannini's Trapunto project. For materials, the pattern and stitching instructions, please see the project first part.

This second and final part of the instructions for the project will cover the finishing.

------------------------------


Finishing:

Pillow Flange: Fold in from the edge to match up with the withdrawn thread outline around the centre part with the Trapunto and baste. Whipstitch the corner seams closed. Execute the simple hemstitch to secure the flange and remove basting threads. 


Button flap: Sew the two pieces together with a seam allowance of 1 cm, leaving an opening of about 2.5 cm on one of the long sides in order to turn the piece right-side out. Turn right-side-out, using an awl into the corners if necessary to make a small rectangular piece which should measure 10 cm by 2 cm. Whipstitch the hole closed. Attach the two buttons. Attach the button flap to the embroidered piece on three sides with the simple hemstitch. 


Square back piece: On one edge of the square, measure down 5 cm in from the edge and remove one ground fabric thread, leaving the ends free at 1 cm in from either edge to be buried later inside the pincushion. Fold the edge in on all four sides 1 cm and baste. Fold over the side with the withdrawn thread to line the edge up with the withdrawn thread, baste. Using the simple hemstitch, attach the 2 cm hem at the withdrawn thread. Press. Remove basting thread. Line up this piece with the button flap on the embroidered piece and double check that the buttonhole positions line up with the buttons. Create buttonholes using the tailored buttonhole stitch and carefully cut the centres. Using the simple hemstitch, attach this piece to the edge of the hemstitching of the embroidered piece on three sides, the edge with the buttonholes lines up with the button flap.


Stuffed cushion: Sew the two pieces together with a seam allowance of 1 cm, leaving an opening of about 2.5 cm on one side. Turn right-side-out, using an awl into the corners if necessary to make a small square cushion. Press. Insert cotton quilt batting into cushion and whipstitch the opening closed. Place inside the embroidered pincushion and use the buttons to close the back.

I hope you have enjoyed this series on Trapunto and the Guicciardini Coverlet by Silvana Vannini, don't forget to pop in and see her reproduction Trapunto coverlet at the Palazzo Davanzati when you are in Florence

My deepest thanks to Signora Vannini for sharing this incredible experience with us!

About the author:
Silvana Vannini lives in the Tuscan countryside. Now retired, she worked as an instructor of Technical Applications, which in Italy meant, tailoring, sewing, knitting, embroidery, drawn thread work and related activities. Her personal studies in Art History led her to create works of embroidery and painting. 20 years ago she discovered quilting and the perfect medium for expressing herself. She makes small works using many varied techniques like embroidery, appliqué, Florentine Trapunto and others which she also teaches at a few Museums and Foundations. In 2011 she participated in a competition with the theme: The Bag - Necessary Accessory. This led to her selection to participate in the exhibitions which were held for the first time in Florence in Via Toscanella it what was the former studio of the Florentine painter Ottone Rosai (1895-1957), and then in Antwerp, Belgium at the Royal Academy of Fine Arts. She has donated her reproduction of the Guicciardini Coverlet to the Palazzo Davanzati and is presently working on projects for future exhibitions.

Tuesday, July 2, 2013

Trapunto - Silvana Vannini - Part Three


This is the third part of a series written by Silvana Vannini of Italy and translated into English by myself.

Trapunto - Silvana Vannini - Part One
Trapunto - Silvana Vannini - Part Two
Trapunto - Silvana Vannini - Part Four


Trapunto Heart Pincushion Project
by Silvana Vannini

Aside from the charm and romance of the scenes from the legend of Tristan, the Guicciardini Coverlet is also intriguing for the variety of designs on it: four-leaf clovers, grapevines, flowers, foliage, animals, human figures, armour, weapons, naval vessels, architecture, musical instruments, clothing and more, all of which give clues to dating the work and to the political climate at the time it was made. The imperfect hand-drawn designs give a rustic feel to the work and aid in the fascination which draws you in to take a longer look. We present this little heart pincushion with the shields of Tristan bearing the three hunting horns – emblem of the Guicciardini family – and that of Morholt bearing the fleur-de-lys.

Pincushion finished size: 15 cm x 15 cm

Materials:
  • 40ct 100% Bellora ivory-coloured linen 21.5 cm x 21.5 cm for the embroidered piece; 12 cm x 14 cm for the square back piece; 12 cm x 4 cm for the button flap; 2 pieces 12 cm x 12 cm for the stuffed cushion
  • 100% Bellora ivory-coloured linen gauze 10 cm x 10 cm
  • Quilting needle no. 10
  • Tapestry needle no. 18
  • Long Trapunto Needle (optional)
  • Basting thread
  • DMC Linen Floss, colours: L779 Sepia, L822 Beige
  • 100% Cotton yarn, colour: natural or ivory (Cotone Povero)
  • 100% Cotton quilt batting
  • Two buttons 
  • Awl
  • Embroidery hoop
  • Pins
  • Scissors
  • Thimble
  • Water soluble fabric marker


Stitches used in this project:

A note about linen floss: in the interests of authenticity the reproduction quilt was made using DMC linen floss which is difficult to use. It must be cut in short lengths as it tends to unravel. Feel free to substitute DMC cotton floss for easier execution of the embroidery.

Execution:
Use your basting thread to mark the horizontal and vertical centres of your fabric.


Withdraw one fabric ground thread on all four sides of an area 21.5 cm x 21.5 cm on the 40ct linen. Centred inside this area, withdraw one ground thread on all four sides of an area 10 cm x 10 cm leaving a tail at each corner long enough to thread into a needle. Cut out the 21.5 cm x 21.5 cm area along the withdrawn thread channel. Fold over a 1 cm hem to the back side on all edges and baste. Fold the tips of the corners in so that the tips line up to the corners of the withdrawn thread 10 cm x 10 cm area, baste close to the fold. Trim corner seams to 1 cm. Press.


Inside the 10 cm by 10 cm area, centre and trace the design with the water soluble fabric marker. 

Pattern should measure approx. 3.5" x 3.5"

On the back of the fabric pin a 10 cm x 10 cm piece of the linen gauze and baste the two fabrics together. 


Mount your fabric on the straight of the grain into an embroidery hoop making sure to have a taut surface to work on. 


Backstitch all design lines except the heart shape using the embroidery needle and 2 strands of the brown linen floss. Begin and end your thread lengths with a knot on the back of the fabric. Stitch through both layers of fabric. Backstitch the heart outlines in 2 strands of the ecru linen floss. 


Turn the work over and with an awl gently open up the ground fabric threads of the linen gauze and stuff the fleur-de-lys on the shield with the cotton quilt batting. With the tapestry needle gently reposition the ground fabric threads to close the openings you have made. For the hunting horns, use the tapestry needle or a long trapunto needle and a length of the cotton yarn to fill the narrow strips and outlines around the larger ends of the hunting horns. Pass the yarn around the shield outlines and outline of the heart shape. 


When filling with the yarn, choose an angle which will allow you to fill the entire shape with parallel lines. Enter the fabric at the side of the shape just under the backstitches, pull the yarn through leaving the tails a bit outside the entry point and exit out the other side of the shape again, just under the backstitches. Trim the ends but leave tails so you can reposition the yarn if you need to. Begin the next row of yarn filling parallel to the first row and repeat as many times as necessary to fill the shape. Do not overfill. After filling the entire shape, trim all the yarn close to the fabric and work the ground fabric threads closed.  Trim away the excess linen gauze on the back of the work about 1 cm from the heart shape. 


Remove the work from the hoop. With 1 strand of the ecru linen floss and the embroidery needle execute tiny running stitches in evenly spaced diagonal rows on the inner empty parts of the shields. Make the running stitches on the right side of the work very small while the stitches on the back side can be much longer.


About the author:
Silvana Vannini lives in the Tuscan countryside. Now retired, she worked as an instructor of Technical Applications, which in Italy meant, tailoring, sewing, knitting, embroidery, drawn thread work and related activities. Her personal studies in Art History led her to create works of embroidery and painting. 20 years ago she discovered quilting and the perfect medium for expressing herself. She makes small works using many varied techniques like embroidery, appliqué, Florentine Trapunto and others which she also teaches at a few Museums and Foundations. In 2011 she participated in a competition with the theme: The Bag - Necessary Accessory. This led to her selection to participate in the exhibitions which were held for the first time in Florence in Via Toscanella it what was the former studio of the Florentine painter Ottone Rosai (1895-1957), and then in Antwerp, Belgium at the Royal Academy of Fine Arts. She has donated her reproduction of the Guicciardini Coverlet to the Palazzo Davanzati and is presently working on projects for future exhibitions.

Monday, July 1, 2013

Trapunto - Silvana Vannini - Part Two


I am very pleased to offer you an article that I have translated by Silvana Vannini, an Italian lady who reproduced the Guicciardini Coverlet of Florence. The original coverlet resides in storage at the Bargello Museum in Florence and Signora Vannini's reproduction can be found at the Palazzo Davanzati Museum in Florence.

Signora Vannini has also generously created a Trapunto pincushion project to accompany this article which will be posted separately. To reach more readers, I will also be posting the original article in Italian as quite a number of visits to this blog come from Italy.

Other parts of this series of posts can be found here: 

The Guicciardini Coverlet consists of six scenes which describe episodes from the legends of Tristan and Isolde with stitched captions in Sicilian dialect. The piece is thought to have been cut down from it’s original size as there are parts missing from the style of layout which is similar to the more complete piece in London. The Tristan Quilt in London, the larger of the two coverlets, has 14 depictions which occur later in the story. 

Embroidery by Silvana Vannini, designs by Marisa Sardini Silvestri.

Along the left border of the Guicciardini Coverlet are three scenes of Tristan’s arrival at the court of King Mark. The stitched comments for the first scene translate as: How the messenger came to Tristanthe second scene reads: How Tristan and Gorvenal left the court of King Pharamond; the third scene: How Tristan and Gorvenal came before King Mark. The fourth scene is along the bottom and is described: How King Mark invests Tristan

Embroidery by Silvana Vannini, designs by Marisa Sardini Silvestri.

The next four depictions are really two scenes and are framed by borders of four-leafed clover. These two-part scenes depict the departures of both Tristan and Morholt for the islet of St. Samson’s (How Tristan goes to the islet to go to battle and How Morholt went to the islet

Embroidery by Silvana Vannini, designs by Marisa Sardini Silvestri.

and the relative duel between Tristan and the Morholt (How Morholt battles Tristan on horseback and How Tristan battles Morholt and the lance breaks). 

Embroidery by Silvana Vannini, designs by Marisa Sardini Silvestri.

Tristan’s armour and shield bear the Guicciardini coat of arms of three hunting horns. 

Embroidery by Silvana Vannini, designs by Marisa Sardini Silvestri.

Today the reproduction quilt is displayed on a four-post bed in the Camera dei Pavoni [Peacock Bedroom] of the Palazzo Davanzati Museum at no. 13 Via Porta Rossa, Florence, Italy where the original coverlet was displayed from 1956 - 1991. 

The Palazzo Davanzati is a mid-14th century house built by the Davizzi Family and owned  by the Davanzati Family from 1578 - 1838. In 1904 it was purchased by antiquarian Elia Volpi (1838 - 1958) who reopened the Palazzo as a museum in 1910. Purchased by the State in 1951, the Palazzo was reorganized and reopened in 1956 at which time the Guicciardini Coverlet was displayed on loan from the Bargello Museum. The Palazzo Davanzati was closed in 1995 for major restorations and has now been partially reopened with restoration work continuing on the upper floors. There is a large 16th - 19th century lace and embroidery collection on display on the 1st floor that is not to be missed.

The original restored Guicciardini Coverlet is presently kept in a controlled storage environment at the Bargello National Museum at no. 4 Via del Proconsolo, about six blocks away from the Palazzo Davanzati in Florence, Italy and is not on display to the public. 

Although there is a hypothesis that the Guicciardini Coverlet, the Tristan Quilt and a third work of Trapunto which is privately owned were wedding gifts presented in 1395 to Piero di Luigi Guicciardini and Laudamia Acciaiuoli, there are no surviving documents to support this. 

There are many different versions of the story of Tristan and Isolde, dating back to perhaps the late 8th century and the Scottish Highlands. Over the centuries different European countries have added and subtracted to the tales making them relevant to their own peoples. The stories have inspired many artists and scenes from various tales are represented in a wide range of art mediums. On the Guicciardini Coverlet, we find King Pharamond of Gaul or Ferramonte as he was in late 13th century Tuscan prose. We find mention of him in 13th and 14th century Tuscan versions. The Guicciardini Coverlet seems to be freely made up of scenes from a criss-cross of many tales probably well know by the populace at the time.

Trapunto - Silvana Vannini - Part One

Trapunto - Silvana Vannini - Part Three


There is a Trapunto project to accompany this article: Project part one and part two.

To read the Italian version of this article click here.

About the author:
Silvana Vannini lives in the Tuscan countryside. Now retired, she worked as an instructor of Technical Applications, which in Italy meant, tailoring, sewing, knitting, embroidery, drawn thread work and related activities. Her personal studies in Art History led her to create works of embroidery and painting. 20 years ago she discovered quilting and the perfect medium for expressing herself. She makes small works using many varied techniques like embroidery, appliqué, Florentine Trapunto and others which she also teaches at a few Museums and Foundations. In 2011 she participated in a competition with the theme: The Bag - Necessary Accessory. This led to her selection to participate in the exhibitions which were held for the first time in Florence in Via Toscanella it what was the former studio of the Florentine painter Ottone Rosai (1895-1957), and then in Antwerp, Belgium at the Royal Academy of Fine Arts. She has donated her reproduction of the Guicciardini Coverlet to the Palazzo Davanzati and is presently working on projects for future exhibitions.

Further reading:
Arthurian Archives VIII. Italian Literature I. Tristano Panciatichiano edited and translated by Gloria Allaire, D.S. Brewer, Cambridge, England, 2002.
Intorno a due antiche coperte con figurazioni tratte dalle Storie di Tristano [Around two antique coverlets with figures from the Stories of Tristan]. Pio Rajna. In the philology journal: “Romania”, XLII, pgs. 517-579, Librairie Ancienne Honoré Champion Éditeur, Paris, France, October, 1913.
La “coperta” Guicciardini. Il restauro delle imprese di Tristano [The Guicciardini Coverlet. The restoration of the deeds of Tristan]. Edited by Rosanna Caterina Proto Pisani, Marco Ciatti, Susanna Conti, Maria Grazia Vaccari. Edifir Edizioni, Florence, Italy, 2010. There is now an English language edition available.
Un Trapunto Trecentesco [A Fourteenth-Century Quilt]. Lidia Morelli. In the Italian art magazine “Dedalo. Rassegna d’Arte”, Anno II, Volume III, pgs. 770-783, Casa Editrice D’Arte Bestetti e Tumminelli, Milan-Rome, Italy, 1921-22.

On the web:
There is a hidden section on the Bargello National Museum’s website where you can view good close up photos of the original coverlet before the restoration and read details about the restoration process (text in Italian).

The Italian needlework magazine photographer Miky Dessein has posted a video of the interior of the Palazzzo Davanzati during the period of the 2010 exhibition of both the restored Guicciardini Coverlet and the reproduction on YouTube.